Optimizing your site to show up in search engines is a critical part of growing your business. If done right, it can result in thousands of people visiting your site each month, bringing in sales that are not dependent on advertising dollars.
SEO is complicated. It also takes time—it won’t result in overnight traffic to your site, but it’s important to build the foundation for your site’s success and then work a little bit each week and each month to make improvements.
This guide has been especially written for online stores using Shopify. However, the principles apply no matter what platform you’re using.
There are two parts to SEO—onsite and offsite SEO.
This article will explain the basics of both onsite and offsite SEO, and I'll show you the exact strategies and tools I use to increase organic traffic to my sites and my clients' sites.
Onsite SEO
Onsite search engine optimization includes figuring out which keywords you should try to rank for, and then optimizing your site to use those keywords appropriately in page titles, descriptions, and body content. It also includes making sure there are links within your site that point at the important pages.
The first step is to do keyword research, and we’re looking for keywords that meet 3 important criteria:
- Search volume — This one’s pretty obvious: We want keywords that get lots of searches every month.
- Competition — We’re looking for keywords that will be relatively easy to rank for. If there are lots of well-established sites that already rank for a certain keyword, then we probably want to choose a different keyword or we’ll be wasting our efforts.
- Intent to purchase — Some keywords are used by people searching for free information or products that you don’t have. We only want to focus on keywords that are highly relevant to people who are in your target audience and who are already in shopping mode.
Keyword research
I made a video explaining my keyword research process that I’ve used to help my clients build their organic traffic. You can watch the video and read a detailed explanation of my research process below.
My favorite tool right now for doing keyword research is KWFinder (affiliate link—here is a non-affiliate link if you prefer). They have a free plan which you can use to try it out.
Please note that the link above is an affiliate link, which means that I receive a commission if you decide to upgrade to a paid plan at no extra cost to you. I only recommend services that I use myself and honestly recommend. If you decide to use the affiliate link, I deeply appreciate your support.
Here’s a sample search I did on KWFinder to show you what the interface looks like.
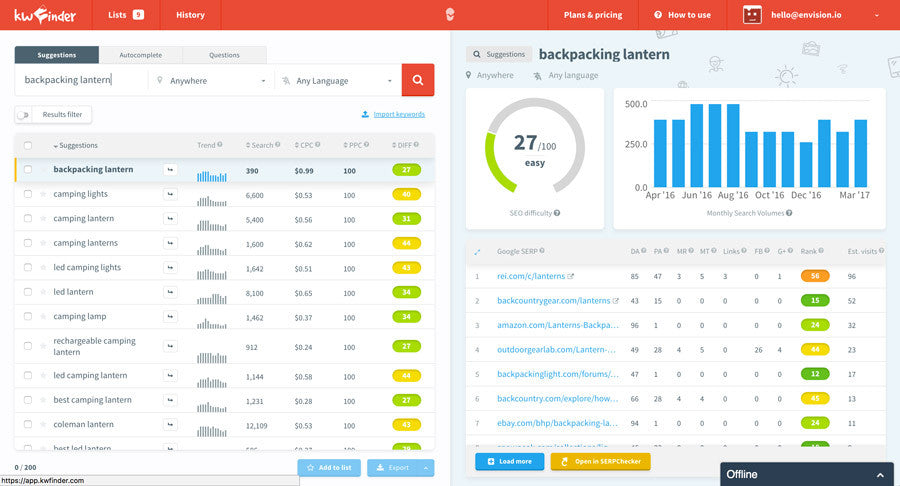
As you can see, I searched for “backpacking lantern,” and the tool gave me statistics on not just this keyword but a bunch of related keywords as well.
Note: You don't have to use this tool. You can also use Google's free Keyword Planner tool, and Moz has their own keyword research tool as well. The nice thing about KWFinder is that they reference many other tools and combine their stats into one simple figure for you.
The most important columns to look at in KWFinder are “Search” (which shows the average monthly search volume over the last 12 months) and “DIFF” (which shows the difficulty score of ranking for that keyword on a scale from 1-100 (1 = Easy, 100 = Difficult).
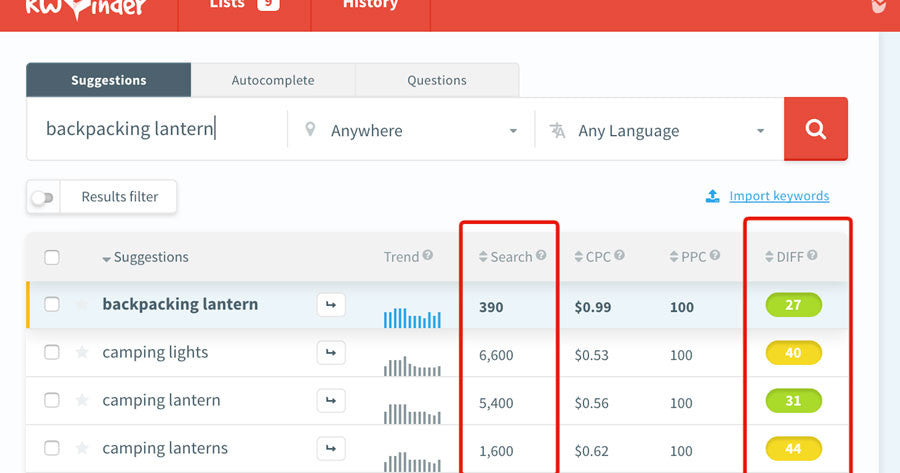
We want to choose keywords with the highest search volume and the lowest difficulty score, in addition to being relevant to your products.
The search volume will vary depending on your niche, but I try to pick keywords with a search volume of at least 1,000, preferably 2,000-5,000 or higher.
I recommend only choosing keywords that have a difficulty score of 35 or lower—the lower the better. Keywords in the 20s are golden, as long as they have enough search volume.
Our goal is to pick 2-3 top keywords that we’ll be optimizing your site for as a whole.
If you only sell a single type of product or a very small number of products, then focus on picking 2-3 keywords that represent your product as a whole. If you sell a variety of products and categories, then choose 1-2 keywords to represent each of your main categories as well.
Summary: Keyword research
- Look for keywords with high search volume (1000+ searches per month) and low difficulty (35 or lower difficulty score).
- Pick 1-2 keywords for each of your main product categories, as well as 2-3 keywords that apply to your site as a whole. Write these down somewhere that you can refer to later (see the video above for an explanation of how to export your keywords into Excel).
Page optimization
Once you’ve created your list of target keywords, the next step is to optimize your site for those keywords. The basics of this process include the following 3 parts:
- Optimize your home page with primary keywords
- Optimize other pages on your site for your category keywords
- Make sure you've set up links to all of your optimized pages
Okay, let's dive into the details of how to do each of these on your site:
Optimize your home page with your primary keywords
To optimize your home page, we’ll want to do the following:
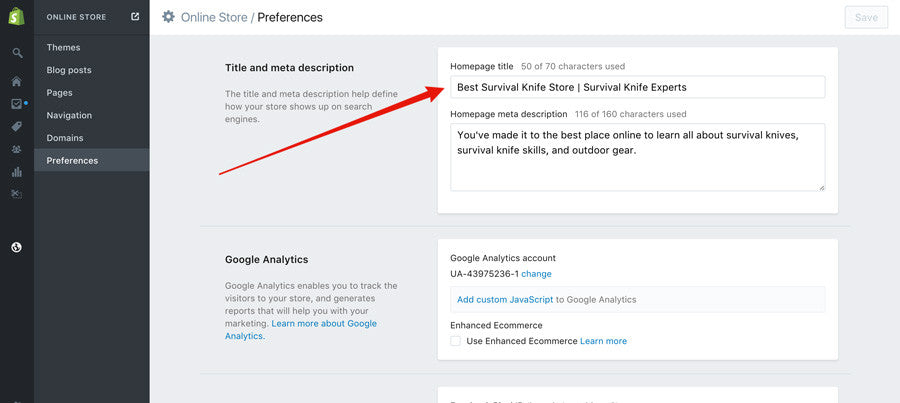
1) Edit the page title to include the top keyword you’ve chosen for your site. This can be done in Shopify by editing the Homepage Title in Online Store > Preferences.
2) Edit the page meta description with an enticing and relevant description of your store, including your primary keyword.
3) Add a heading and a paragraph or two of content somewhere on your home page. Make sure to include your primary keyword in both the heading and paragraph on the home page.
Here's an example of how I did this for my survival knife store:

4) Edit the ALT text of at least one image on the home page to include your primary keyword. This can usually be done by editing the ALT text on a slideshow/hero image OR the ALT text of a product image that’s featured on your home page.
Optimize other pages on your site for your category keywords
We want to make sure that for each of our target keywords, we have at least one page on your site that’s fully optimized for that keyword. The optimization you'll do for each page is similar to what we did on the home page—see the section below with the heading "Optimization Checklist" for a complete list of what to do on each page.
When setting up these optimized pages, we’ll have to decide if we want to create them as collections, products, pages, or blog posts—our choice will depend on the keyword and what seems most appropriate.
For example, if the keyword we’re optimizing for is “camping lanterns,” then this would be perfect for a collection (category) in Shopify. We’ll either create a new collection or edit an existing one to use that keyword in the title and description.
However, if the keyword is more specific, e.g., “Coleman LED camping lantern,” then this might be more appropriate for a specific product page. In that case, we’d want to edit the product page to include that exact phrase in the title and description.
If you’re trying to rank for a keyword that seems more general and informational, you might want to create a blog post. For example, maybe you’ve found that a great potential keyword is “best camping lanterns.” In this case, you could write a blog post with “best camping lanterns” in the title and article body.
Whether you create a collection, product, page, or blog post, make sure to include the following important step:
Edit the "Search engine listing preview" section, making sure to include your keyword in both the page title and description. Also, check the URL/handle to make sure that it includes your keyword. Here's an example of how I did this for one of my collections with the keyword "cold steel survival knives."

Tip: If you write a blog post for a keyword, make sure to also include at least one link within the article to one of your collections or products (whichever is most relevant). This will not only drive traffic when your blog readers click on the link—it will also add some SEO juice to your collection or product pages and help them rank higher.
Optimization checklist
Make sure to include as many of the following as possible on your optimized pages:
- Keyword in title
- Keyword in description or body text (preferably once within the first few sentences and possibly once more if the page contains multiple paragraphs of text)
- Keyword in the URL (handle)
- At least one image that has the keyword in the ALT text
- If appropriate and if a relevant video exists, include an embedded YouTube or Vimeo video (this works best on blog posts and product pages). Even better—make your own video, upload it to YouTube, and then embed it on your site.
Create internal links
After optimizing your collections, products, pages, and blog posts with all of your target keywords, the next step is to make sure that we have links within your site to each of those pages.
For example, if you set up a collection called “Camping lanterns” but there’s no link to that collection in your site navigation, then we’re shooting ourselves in the foot because we haven’t given Google or users an easy way to find the new page, and we haven’t shown Google that it’s an important page.
Whether it’s in your primary site navigation or your footer menus, make sure to link to all of the pages we’ve optimized for your top keywords. If your new collections don’t quite fit into your normal navigation hierarchy in a way that makes sense, consider including a “Featured categories” menu somewhere with a list of the new keyword-optimized collections.
You can also scatter links to these collections and products throughout the site in blog posts and other pages, but for the more important keywords, try to include them somewhere in the site navigation menus.
Site speed optimization
If your site loads slowly, then Google may penalize it. Make sure that you’ve done everything you can to make it load quickly, including the following:
- Avoid installing too many Shopify apps that add widgets and other features on the site—apps can easily bloat your site with third-party scripts that slow it down. Occasionally go through your apps and remove any that you don’t need.
- Compress your photos using an app like Minifier to reduce their file size. Unnecessarily large images are the biggest culprit in slowing down most Shopify stores. If you use Photoshop or similar image editing software, you can export your images as compressed JPGs to reduce the file size, which accomplishes the same thing as the Minifier app. In general, we want to get most images around 150kb or smaller, and image dimensions should usually be no larger than 1500px on the longest edge.
Mobile optimization
This should go without saying, but your site needs to be mobile-friendly. If you’re still using a design from years ago that doesn’t adapt its layout to mobile devices, then you need to update to a modern theme ASAP. Having a site that’s not mobile-friendly is not only killing your conversions—it’s also probably hurting your SEO, since Google prefers sites that are mobile-friendly.
Offsite optimization
The other big factor in SEO is how many backlinks your site has (that is, how many other websites are linking to you). Google views each backlink as a “vote in your favor,” and this results in your site gaining authority and showing up higher in search results.
There are a few strategies you can use to help you get backlinks, including finding opportunities for you to publish guest articles on other blogs, getting products reviewed by bloggers, getting sponsored posts published, and more.
Important: Before going out and trying to get backlinks, it's important for you to have quality content on your site that people will actually want to link to. This probably means creating really well-written blog posts or resource pages on your site that are relevant to your niche and that provide truly valuable information to people in your target audience.
Here are my two primary recommended strategies for getting backlinks:
Backlink Strategy 1: Find out where your competitors are getting backlinks, and try to get links from the same sites
If a site has already linked to one of your competitors, then there’s a good chance that they’d be willing to work with you and give you a backlink too, whether that’s through a guest post, sponsored article, resources list, or product review.
First we need to figure out who is already linking to your competitors, and then start reaching out to them to set something up that would include a backlink.
Here is my step-by-step process:
1) Make a list of 5-10 competitors. Try to include a mix of well-established brands and small startups that are selling similar products to what you sell.
2) One by one, plug the URL for each competitor into Open Site Explorer (a free tool by Moz).
3) Open Site Explorer will spit out a list of backlinks that each of your competitors has. In the filter drop downs, change “Target” to “this root domain” and “Link Type” to “link equity.”

4) Click “Request CSV.” OSE will then email you a download link to download the full list of backlinks.
5) Repeat Steps 1-4 for all of your competitors, then copy and paste the contents of the CSVs into one big Excel file so you have them all in one place.
6) Sort your data by the Domain Authority column from largest to smallest. Hide all of the rows containing sites with a DA (Domain Authority) greater than 70 and less than 10.
The reason we hide the rows on the high and low ends of DA is because this is a measure of how well-established a site is. The DA limits I recommended of 70 on the high end and 10 on the low end are flexible—feel free to tweak those based on your needs. Sites with DAs of more than 60 or 70 are probably going to be much harder and more expensive to get a backlink from, and sites with a DA of less than 10 aren’t going provide much SEO juice, so it’s better to focus our efforts on the sites that aren’t too big and aren’t too small. The sweet spot is probably going to be in the range of 20-50 or so.
7) You now have a big list of backlinks that your competitors have. You can click on any URL in the spreadsheet to view the exact page that contains the backlink.
Start reaching out to each site using their contact form or an email address. Depending on the site, you may want to pitch them on the idea of a guest article, product review, sponsored post, “resources” page link, or something else. Use the backlinks that your competitors already have on each site as a guideline for what type of link the site will be most likely to give you.
Backlink Strategy 2: Find broken links on other sites and try to get them to link to your site instead
Often a site will have broken links, which are simply links that no longer work because the page they originally linked to no longer exists.
If you can point out to someone that their website has a broken link, you’re doing them a favor, since broken links can hurt their SEO and aren’t user-friendly.
This strategy involves finding other sites that have broken links that are supposed to be pointing at a site similar to yours, and then contacting the site’s owner or webmaster and helpfully letting them know about the broken link. When you tell them about the broken link, you can suggest that they link to your site instead, and voila—you have a new backlink!
Here are the steps involved:
1) Make a list of sites that you’re going to check for broken links. These will often be sites that are about the same industry that you’re in. If you already know of some sites in your industry, great—add them to the list.
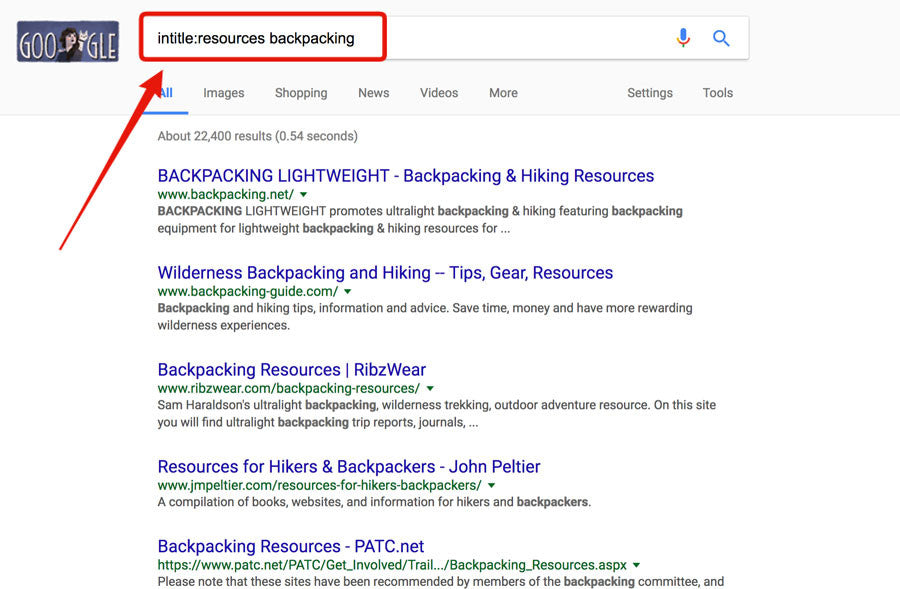
One trick to find sites to add to your list is to search Google for sites that have a “Resources” page with a bunch of links to other sites. To easily find sites related to your niche that also have Resources pages, try searching in Google for “intitle:resources (insert your keyword here)”. This will show you search results for web pages that have both the word “resources” and your keyword in the title.
For example, let’s say I’m trying to find sites that have a Resources page related to the topic of backpacking. I search in Google for “intitle:resources backpacking”, which shows me a bunch of pages that have both “resources” and “backpacking” in their titles.
You can also use searches like “insite:resources (your keyword)” to find search results where the word “resources” and your keyword are anywhere on the site, rather than just in a single page title.
These are awesome candidates to check for broken links and ask about getting a backlink to your site, since they already have Resources pages.
2) Once you have your list, go to brokenlinkcheck.com and enter the URLs, one by one. It will spit out a list of URLs from each site that have broken links. Click on “url” to see the page where the broken link is, or click “src” to view the code that shows exactly where the broken link is on the page.
Copy the URLs of any sites that you want to contact into an Excel sheet—this is for your reference only so format it however you want. I recommend keeping all of the site URLs in the first column.
3) For each URL on your list, find the name and email address of the person who owns the site or the webmaster/developer OR the URL of their "contact us" page. You can use the tool hunter.io to enter a domain and quickly find all email addresses associated with it, or you can just use the site’s contact form if they have one. I recommend adding a column on your spreadsheet from Step 2 for the name and email for each domain (or the contact page URL), so you can contact them all later.
4) Once you have all of the names and emails (or contact page URLs) for your list, start sending emails. Make them friendly and short for the best chance of being read.
Get to the point quickly—tell them that you found a broken link on their site and mention that this could be hurting their SEO. Suggest that they could link to your URL instead.
Make sure that you’re suggesting a URL from your site that is actually relevant and that would be a legitimately good replacement for the original link. If you’re not sure, plug the original (now broken) URL into the Way Back Machine, which lets you look at old archived versions of web pages even if they no longer exist.
You won’t get responses for most of the emails you send, but I’d consider it successful if between 5-15% of the people you contact end up changing their broken link to point at your site. In other words, plan on finding 100 broken links in order to get 5-15 backlinks. If you’re having trouble getting this to work, try tweaking your email pitch to be shorter/more complimentary.
Important backlink tips
- Don’t make all of your backlinks point at your home page. Include links to other pages as well, including collections, products, pages, and blog posts (if relevant).
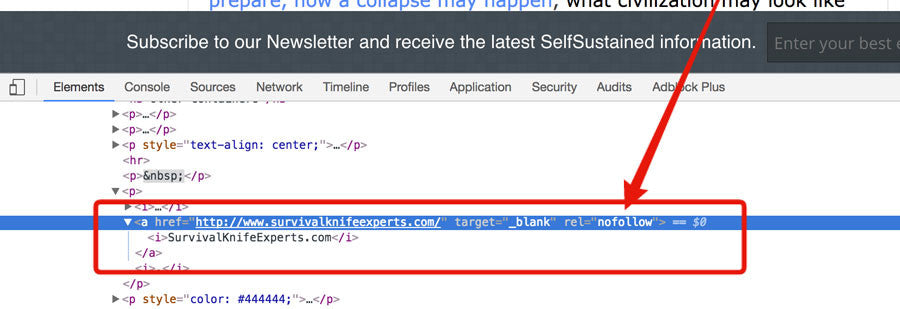
- As much as possible, make sure that any link you get is “do follow,” which means that it does provide “SEO juice.” If a link is marked as “nofollow”, it does not provide SEO juice. You can tell if a link is “nofollow” by right-clicking on it and clicking “Inspect element.” The link code looks like this: <a href=“(URL)”>link text</a>. If it contains rel=“nofollow”, then it’s a nofollow link, and will look like this: <a rel=“nofollow” href=“(URL)”>link text</a>.
- Use a variety of text for your “anchor text” (the linking text). For example, some links’ anchor text may be “click here,” others may be your brand name, others may be one of your target keywords, etc.
- You should work to gradually increase your backlinks over time. Try to work a little on this each week, since a one-time effort won’t produce huge results. The good news is that backlinks have a snowball effect: The more links you get, the higher your site will show up in search results, and the more traffic you’ll get. This often results in sites linking to you naturally just because someone found your site and wants to link to you.
- Remember how we used Open Site Explorer to see what backlinks your competitors are getting? You can also plug your own site into that tool to see what backlinks you already have and keep track of which links are coming in over time.

Closing
And there you have it—my complete guide to SEO for ecommerce sites on Shopify. If you have any questions or suggestions, leave a comment below.
If you decide that you need a little help with getting your site up to speed with SEO, check out our SEO packages here.