
Some of the tutorials here at Ecommerce Pulse require you to edit the CSS for your Shopify theme. If you're not a web developer, you may not be sure how to edit this, so this post will simply show you where to go to find it.
1. Log in to your Shopify Admin.
2. In the sidebar on the left, click on "Online Store."
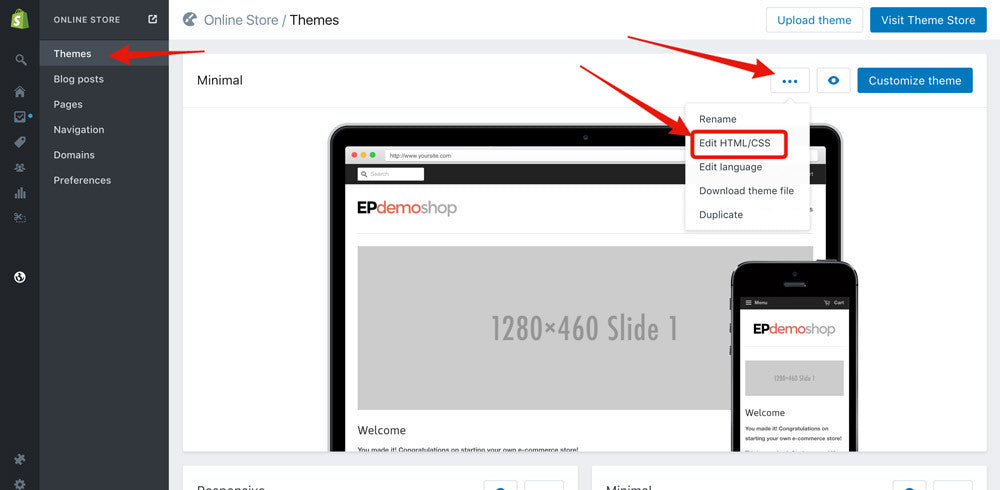
2. You'll be on the "Themes" page by default. Click on the "..." button for your currently published theme, then click "Edit HTML/CSS."
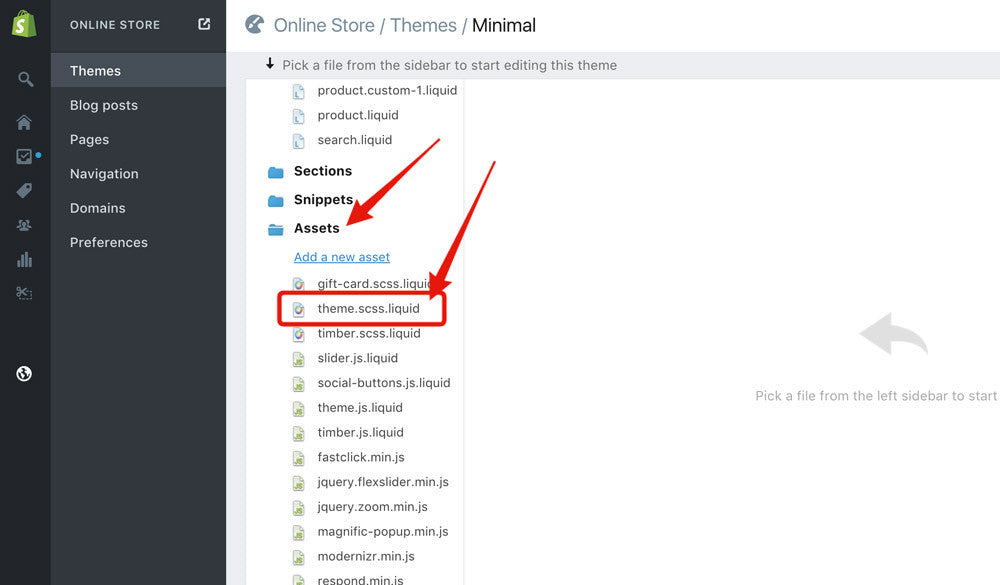
3. On the left side, scroll down to the Assets folder, then click on it and click on the CSS file. It will probably be named something like style.css.liquid or theme.css.liquid, although this may vary depending on which theme you are using.
Many themes now use SCSS, so it may look something like this: "style.scss.liquid" or "theme.scss.liquid." If you don't see a file with this name, look for another file that ends in ".css.liquid" or ".scss.liquid." This is the file you'll be editing to add your CSS.
4. Add your CSS!
If you are following another Shopify tutorial on Ecommerce Pulse, go back to that page now to continue the tutorial. Note: To avoid interfering with the existing CSS, I suggest scrolling down to the bottom of the file and adding CSS there.
Comments (3)
[…] under Themes > Template Editor. If you don’t know where to find this, follow the steps in this post: How to edit the CSS of your Shopify theme. Note: The name of your CSS file may vary depending on your theme, but it will end in […]
[…] How to Edit the CSS of Your Shopify Theme – If you’re not a developer and want to edit the code on your Shopify theme then this post […]
What i do not reaqlize is actually how you are nott actually a
lot more well-appreciated than you might be right now.
Yoou are so intelligent. You kno thus significantly wirh regards to
this topic, mmade me for my part imagine it from numerous various angles.
Its like women and men aren’t interested except it’s something to accomplish with Woman gaga!
Your individual stuffs nice. At all times handle it up!